Introduction:
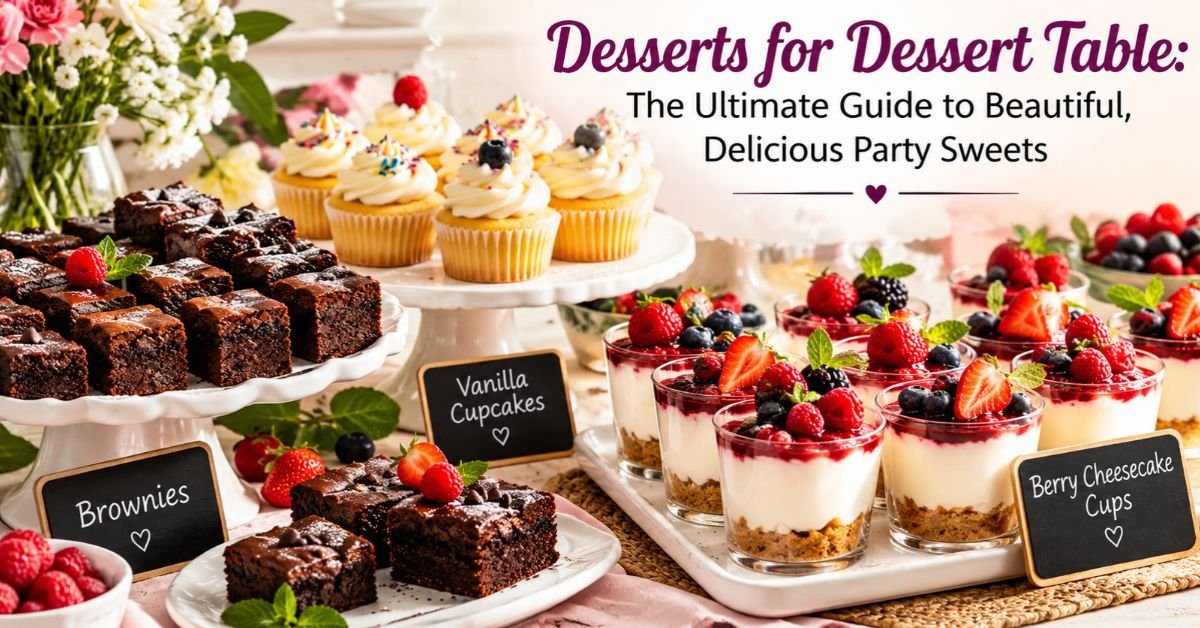
A beautiful dessert table can turn an ordinary gathering into a celebration that guests remember long after the last bite. Imagine a spread filled with glossy chocolate brownies, soft vanilla cupcakes, delicate fruit tarts, creamy cheesecake bites, and fresh berries arranged in colorful bowls. The aroma of warm chocolate, sweet vanilla, toasted nuts, and buttery pastry creates an inviting atmosphere, while the contrast of rich, creamy, crisp, and fruity textures makes every dessert feel special.
Choosing the right desserts for dessert table arrangements, however, requires more than selecting a few attractive sweets. The best spread balances flavor, color, portion size, preparation time, and convenience. Guests should be able to sample several treats without feeling overwhelmed by overly rich portions. Meanwhile, the host needs desserts that look appealing, hold their shape, and can be prepared without spending the entire event in the kitchen.
At DaliyDelish.com, this guide focuses on a practical dessert-table centerpiece: a selection of mini chocolate brownies, vanilla cupcakes, and fresh berry cheesecake cups. Together, these three treats provide a useful balance of chocolate richness, light vanilla sweetness, and refreshing fruit flavor.
The recipes and techniques in this guide are designed around reliable home-baking principles. Brownies should have a moist, fudgy center; cupcakes should remain soft rather than dry; and cheesecake cups should have a smooth, creamy filling with a pleasant tang from cream cheese and berries.
The key to a successful dessert table is preparation. Baking in manageable batches, measuring ingredients accurately, chilling delicate desserts, and arranging treats at different heights can make a simple homemade spread look polished and inviting.
Whether you are planning a birthday party, baby shower, wedding reception, holiday gathering, or family celebration, these desserts for dessert table planning offer practical ideas for creating a spread that tastes as wonderful as it looks.
Recipe Quick-Facts Summary Card
This dessert-table collection includes three complementary treats that can be served together or prepared separately.
- Preparation time: 45 minutes
- Cooking time: 25–30 minutes
- Cooling and chilling time: 2–3 hours
- Total elapsed time: Approximately 3–4 hours, including cooling and chilling
- Active kitchen time: Approximately 70–80 minutes
- Skill level: Beginner to intermediate
- Estimated yield: 24–30 small dessert portions, depending on portion size
- Serving suggestion: One to two mini desserts per guest initially
- Estimated calories: Approximately 100–220 calories per piece, depending on the dessert and portion size
- Estimated cost: Approximately 0.40–1.25 per small portion in a US grocery-shopping context; actual costs vary by location, brand, season, and ingredient quality
- Primary diet type: Conventional dessert collection
- Make-ahead suitability: Excellent when components are stored separately and chilled desserts remain refrigerated
- Best occasions: Birthdays, bridal showers, weddings, office parties, baby showers, and holiday celebrations
Collection overview
| Dessert | Texture | Flavor profile | Best serving style |
| Mini chocolate brownies | Dense and fudgy | Deep chocolate | Small squares on a platter |
| Vanilla cupcakes | Soft and tender | Sweet vanilla and butter | Individual cupcake liners |
| Berry cheesecake cups | Smooth and creamy | Tangy cream cheese and fresh fruit | Small chilled dessert cups |
These estimates are planning guidelines, not laboratory-tested nutrition figures. For accurate nutritional information, calculate the values using the specific ingredients and portion sizes you use.
Why This Dessert Table Collection Works
A successful dessert table should offer variety without creating unnecessary work. This collection combines complementary flavors and textures while allowing each component to be prepared using familiar kitchen techniques.
- Balanced flavor selection: Chocolate brownies satisfy guests who enjoy deep cocoa flavors, vanilla cupcakes provide a familiar sweet option, and berry cheesecake cups introduce a refreshing, slightly tangy contrast. As a result, the table feels more varied than one containing several nearly identical chocolate desserts.
- Practical portion control: Small brownies, mini cupcakes, and individual cheesecake cups allow guests to sample different treats. Smaller portions also help hosts estimate quantities and reduce the likelihood of large amounts of uneaten dessert.
- Efficient preparation: Brownies and cupcakes can be baked ahead, while cheesecake cups can be assembled and chilled before the event. Preparing each component separately creates a more manageable schedule than attempting every dessert on the day of the celebration.
- Flexible presentation: The desserts can be arranged on cake stands, trays, platters, or individual serving boards. Neutral plates make colorful berries stand out, while simple cupcake liners and consistent brownie sizes give the display a professional finish.
- Adaptable ingredient choices: The collection can be adjusted to accommodate selected preferences. For example, gluten-free flour blends may work in brownies and cupcakes when used according to their package guidance, while dairy-free cream cheese alternatives can be used for a separate cheesecake-style dessert. However, substitutions may change texture, flavor, and setting.
The biggest advantage is that the collection does not depend on complicated pastry techniques. Accurate measuring, controlled baking, sufficient cooling, and careful arrangement deliver much of the quality associated with a professional dessert display.
Kitchen Tools & Equipment Guide

The right equipment improves consistency and makes dessert preparation easier.
Essential baking tools
- Digital kitchen scale: Provides more consistent measurements than estimating flour or sugar by volume.
- Measuring cups and spoons: Useful for home bakers who follow US customary measurements.
- Mixing bowls: Keep dry ingredients, wet ingredients, and frosting components separate until needed.
- Whisk and silicone spatula: A whisk combines ingredients smoothly, while a spatula helps fold mixtures without unnecessary mixing.
- 8-inch square baking pan: Suitable for a small batch of brownies.
- 12-cup muffin pan: Makes standard cupcakes that can be divided into smaller servings if desired.
- Small dessert cups: Ideal for individual no-bake cheesecake portions.
- Oven thermometer: Helps identify inaccurate oven settings.
- Instant-read thermometer: Useful for checking certain baked products when appropriate, although visual and texture checks remain important for brownies and cupcakes.
- Wire cooling rack: Allows air to circulate around baked goods, reducing condensation on their bases.
- Piping bag and nozzle: Optional tools for neatly decorating cupcakes.
Use clean, dry equipment and line pans with parchment paper where appropriate. Most importantly, allow brownies and cupcakes to cool before cutting or frosting them. Warm baked goods can crumble, while frosting can melt and slide off a hot cupcake.
Ingredient Selection, Quality & Substitutions
The following ingredient lists produce three small dessert batches suitable for a mixed dessert table. The quantities are designed for home preparation and can be scaled up as needed.
A. Mini Chocolate Brownies
Ingredients
- Unsalted butter: 113 g (½ cup)
- Granulated sugar: 200 g (1 cup)
- Large eggs: 2, approximately 100 g without shells
- Vanilla extract: 5 ml (1 teaspoon)
- Cocoa powder, unsweetened: 40 g (about 13-12 cups, depending on the product).
- All-purpose flour: 65 g (about ½ cup)
- Fine salt: 1 g (⅛–¼ teaspoon)
- Optional chocolate chips: 60 g (⅓ cup)
Why these ingredients matter
Butter contributes richness and helps create a tender, dense texture. Sugar adds sweetness, supports moisture retention, and contributes to the delicate surface crust that develops in many brownie recipes. Structure and binding are provided by eggs.
Cocoa powder supplies concentrated chocolate flavor without adding the extra fat found in solid chocolate. Meanwhile, a modest amount of flour helps the brownies hold their shape without making them cake-like.
Choose unsweetened cocoa powder for better control over sweetness. If you prefer a more intense chocolate flavor, use a good-quality cocoa powder and add the optional chocolate chips.
Possible substitutions
- Replace the all-purpose flour with a suitable gluten-free baking blend designed for a one-to-one substitution. Results vary by brand.
- As an alternative to butter, try a dairy-free baking stick. Avoid products with a high water content.
- Choose certified gluten-free chocolate chips when gluten avoidance is essential.
- Reduce the chocolate chips or omit them if you prefer a less rich dessert.
B. Vanilla Cupcakes
Ingredients
- All-purpose flour: 125 g (1 cup)
- Granulated sugar: 100 g (½ cup)
- Unsalted butter, softened: 85 g (6 tablespoons)
- Large egg: 1, approximately 50 g without shell
- Milk: 120 ml (½ cup)
- Baking powder: 5 g (1¼ teaspoons)
- Vanilla extract: 5 ml (1 teaspoon)
- Fine salt: 1 g (⅛–¼ teaspoon)
Ingredient quality and function
Softened butter should yield slightly when pressed but should not be oily or melted. This allows it to combine evenly with sugar. Fresh baking powder supports the cupcakes’ rise, while milk contributes moisture and helps produce a tender crumb.
Pure vanilla extract offers a rounded aroma, although a good-quality vanilla flavoring can also be used. For the most consistent results, bring the egg, milk, and butter to a similar cool room temperature before mixing.
Possible substitutions
- Use a suitable dairy-free milk and baking stick for a dairy free version.
- Use a gluten-free flour blend formulated for cakes, following its instructions.
- For a less sweet finish, reduce the frosting rather than drastically reducing the cupcake sugar, because sugar also affects moisture and structure.
C. Berry Cheesecake Cups
Ingredients
- Full-fat cream cheese, softened: 225 g (8 oz)
- Heavy whipping cream, cold: 120 ml (½ cup)
- Powdered sugar: 40–50 g (⅓–½ cup)
- Vanilla extract: 5 ml (1 teaspoon)
- Lemon juice: 10 ml (2 teaspoons)
- Fresh strawberries or mixed berries: 150 g (about 1 cup, chopped as needed)
- Digestive biscuits or graham crackers: 80 g (about ¾ cup, crushed)
- Melted butter: 30 g (2 tablespoons)
Why these ingredients work
Cream cheese provides the characteristic tangy flavor and creamy body. Cold whipping cream adds lightness when whipped before folding into the filling. Powdered sugar dissolves readily, reducing the gritty texture that can occur when granulated sugar is used in a cold filling.
Lemon juice brightens the dairy-rich mixture, while fresh berries contribute color and a naturally tart contrast. Crushed biscuits mixed with melted butter create a simple base without requiring an oven.
Possible substitutions
- Use dairy-free cream cheese and a suitable dairy-free whipping alternative. Check whether the products whip and set adequately.
- Use gluten-free biscuits for a gluten-free version.
- Replace strawberries with blueberries, raspberries, or finely diced mango.
- Reduce the powdered sugar slightly if the fruit is very sweet, while keeping enough sweetness to balance the cream cheese.
Allergen note: These desserts may contain wheat, dairy, eggs, and other allergens depending on the products used. Check labels carefully and prevent cross-contact when preparing food for guests with allergies.
Culinary Masterclass: Step-by-Step Instructions
Although the original collection includes several desserts, the preparation process is easiest when organized into four stages: preparation, baking, assembling the chilled dessert, and finishing the display.
Step 1: Prep Work & Seasoning
Prepare the workspace
Wash your hands, clean the work surfaces, and gather the ingredients before starting. Preheat the oven to 175°C (350°F). If your oven runs hot, use an oven thermometer to confirm its actual temperature.
Line an 8-inch square pan with parchment paper. Place cupcake liners in a 12-cup muffin pan. Set aside the dessert cups for the cheesecake.
Measure all ingredients accurately. This is especially important for flour, cocoa powder, and baking powder because excessive quantities can change the texture significantly.
For the brownies, melt the butter gently and let it cool until warm rather than hot. For the cupcakes, soften the butter until it is pliable but still holds its shape.
Under cool running water, rinse and dry the berries for the cheesecake cups. Excess moisture can make the filling watery and soften the biscuit base. Keep the berries refrigerated until you are ready to assemble the cups.
Prepare the brownie mixture
Whisk the sugar into the melted butter. Add the eggs and vanilla, then mix until the ingredients look glossy and evenly combined.
Sift the cocoa powder, flour, and salt into a separate bowl. Fold the dry ingredients into the wet mixture with a spatula. Stop when no obvious streaks of dry flour remain. Overmixing can develop excess gluten and create a tougher texture.
Fold in the optional chocolate chips.
Prepare the cupcake mixture
Cream the softened butter and sugar together until lighter in color and fluffy.In general, electric mixers take two to three minutes to do this.
Add the egg and vanilla, then mix until incorporated. In another bowl, combine the flour, baking powder, and salt.
Alternate adding the dry ingredients with the milk. Begin and finish with the dry ingredients, mixing only until the batter is smooth. Avoid prolonged beating after adding the flour.
Step 2: Searing & Sautéing
This collection does not require searing or sautéing because it consists of baked and chilled desserts. Instead, this stage focuses on controlled baking, which performs a similar role in developing flavor and structure.
Bake the brownies
Evenly spread the brownie mixture in the baking pan. Smooth out the top layer so the entire brownie bakes at the same time.
Bake for approximately 20–25 minutes at 175°C (350°F). Start checking at the earlier end of the range because ovens and pans vary.
The edges should appear set, while the center should remain slightly soft.Stick a toothpick into the center. A few crumbs are okay, but if the batter is still wet, it needs more baking time.
Do not wait for the toothpick to emerge completely clean if you want fudgy brownies. Excessive baking drives off moisture and produces a drier result.
Bake the cupcakes
Divide the cupcake batter evenly among the liners, filling each approximately two-thirds full.
Bake for around 18–22 minutes at 175°C (350°F). The cupcakes are ready when the tops spring back lightly after a gentle touch and a toothpick inserted into the center comes out clean or with a few dry crumbs.
When baking for the first time, do not open the oven door repeatedly. Suddenly dropping temperatures can interfere with rising.
Transfer the cupcakes to a wire rack after a few minutes in the pan. Let them cool completely before decorating.
Step 3: Sauce Building & Simmering
No cooked sauce is required for this collection. The cheesecake filling, however, benefits from the same attention to texture and ingredient balance that a chef applies when building a smooth dessert sauce.
Prepare the biscuit base
Place the biscuits in a sealed bag and crush them with a rolling pin until they resemble fine crumbs. Transfer them to a bowl and stir in the melted butter.
The mixture should resemble damp sand. If it looks dusty, check that the butter is evenly distributed before adding more. Press approximately one to two tablespoons into the bottom of each dessert cup.
Refrigerate the cups for 10–15 minutes to help the base firm up.
Whip the cream
Pour the cold whipping cream into a chilled bowl. Beat until medium peaks form. When the whisk is lifted, the cream should hold a soft shape with a tip that bends slightly.
Avoid whipping until the cream becomes grainy. Overwhipped cream can separate and create a less pleasant texture.
Make the cheesecake filling
In a separate bowl, beat the softened cream cheese until smooth. Add the powdered sugar, vanilla extract, and lemon juice, then mix until evenly combined.
Scrape down the sides of the bowl to remove lumps. Fold in the whipped cream with a spatula, using gentle movements to preserve its airiness.
Taste a small amount. The filling should be creamy, lightly tangy, and sweet enough to balance the berries. Adjust the sweetness modestly if needed.
Spoon or pipe the mixture over the chilled biscuit bases. Smooth the tops and refrigerate for at least two hours.
Step 4: Finishing, Resting, and Garnishing
Cool and cut the brownies
Allow the brownies to cool completely in the pan. For cleaner cuts, refrigerate them briefly after cooling, then lift them out using the parchment paper.
Cut into small, even squares with a sharp knife. Wipe the blade between cuts to keep the edges neat.
If the brownies crumble excessively, they may still be warm or slightly overbaked. Letting them cool fully usually improves their structure.
Decorate the cupcakes
Once completely cool, pipe a modest swirl of frosting onto each cupcake if desired. A simple vanilla buttercream pairs well with the brownie and cheesecake flavors.
Finish with a small berry, a dusting of cocoa powder, or a few chocolate shavings. Keep the decoration proportional to the cupcake so that it remains easy to handle.
Finish the cheesecake cups
Pat the berries dry once more. Add a small spoonful of berries to each cup shortly before serving. This prevents the fruit juices from spreading across the creamy surface during extended storage.
For extra visual appeal, alternate strawberries, blueberries, and raspberries. Keep the toppings light so that the cheesecake remains the main feature.
Arrange the dessert table
Place brownies on a flat platter, cupcakes on a stand, and cheesecake cups on a tray that can be moved easily to refrigeration.
Use different heights to create visual interest, but keep serving tools accessible. Put chilled desserts out in small batches rather than leaving the entire supply at room temperature for a prolonged period.
The Science of Flavor & Chef’s Insider Techniques
Understanding a few baking principles makes dessert preparation more predictable.
Moisture and brownie texture
Brownies contain a higher proportion of fat and sugar relative to flour than many cakes. This helps create their dense, tender texture. Too much flour can make them cakier, while excessive baking can evaporate moisture and produce dry edges.
A glossy brownie surface often develops when sugar dissolves adequately and interacts with egg proteins during baking. The result depends on the recipe, mixing method, and ingredient proportions, so a glossy top is desirable but not guaranteed.
Cupcake structure
Baking powder releases gas that expands as the batter heats. Eggs and flour help set the structure around those bubbles. Creaming butter and sugar can incorporate air, helping cupcakes rise and develop a finer crumb.
However, once flour is added, excessive mixing encourages gluten development.As a result, the batter should only be mixed until the dry ingredients have disappeared.
The role of temperature
A correctly heated oven promotes predictable rising and browning. An oven that is too hot may set the edges before the center finishes baking. A cooler oven may produce pale surfaces or extended baking times.
Room-temperature butter is particularly important for creaming, whereas cold cream is easier to whip. Matching each ingredient to the technique improves consistency.
Balancing richness with acidity
Butter, chocolate, cream cheese, and whipped cream contribute fat and richness. Lemon juice and fresh berries introduce acidity, making the overall dessert experience feel more balanced.
This is why a fruit-based dessert works well alongside chocolate brownies. The contrast refreshes the palate rather than making every bite taste equally rich.
Professional presentation techniques
- Use consistent portions so guests can compare desserts easily.
- Chill cheesecake cups before topping them.
- Use a warm, dry knife for neat brownie cuts, wiping it between slices.
- Keep garnishes simple and repeat colors across the display.
- Avoid excessive frosting, which can overwhelm smaller cupcakes.
The most reliable professional technique is restraint: measure carefully, avoid unnecessary mixing, and allow each dessert to cool or set fully before presentation.
Common Cooking Mistakes & Troubleshooting Guide
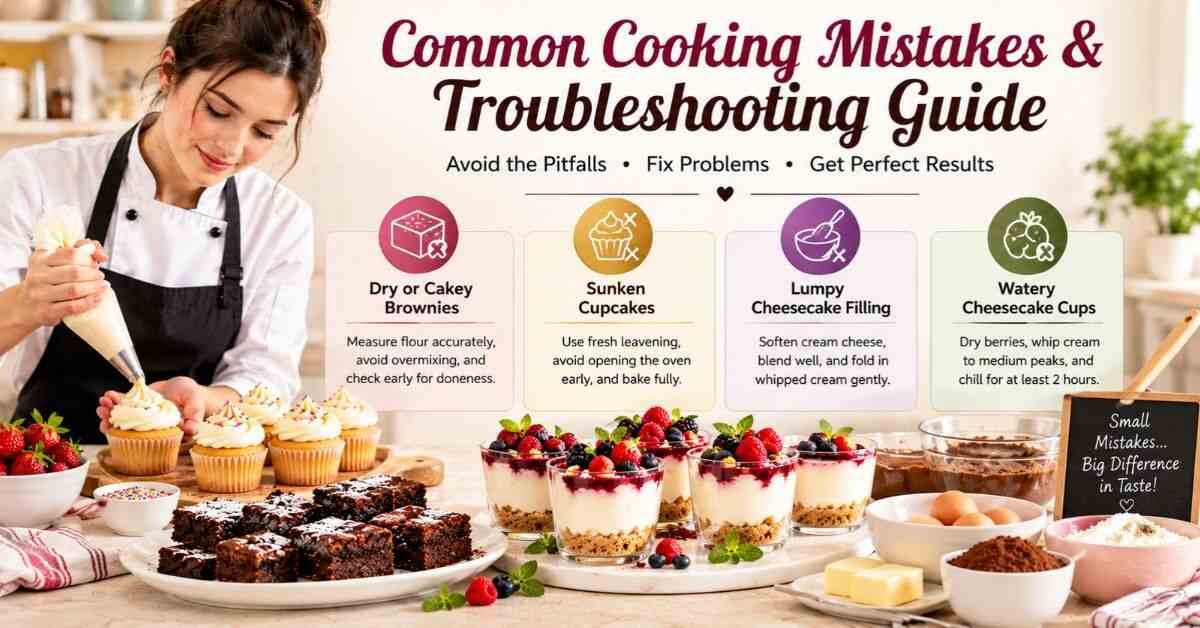
Mistake 1: Dry or cakey brownies
Why it happens: Too much flour, excessive mixing, or prolonged baking can produce a dry texture.
How to prevent it: Measure flour accurately, fold gently, and begin checking the brownies at 20 minutes. Remove them when the edges are set and the center no longer contains wet batter.
How to correct it: If the brownies are slightly dry, serve them with fresh berries or a small amount of chocolate sauce. They will not return to their original texture, but a complementary topping can improve the eating experience.
Mistake 2: Cupcakes that sink in the middle
Why it happens: The batter may be underbaked, the oven door may have been opened too early, or the baking powder may be old.
How to prevent it: Check the freshness of the raising agent, measure carefully, and avoid opening the oven during the early baking stage.
How to correct it: If the cupcakes are fully baked but have shallow dips, cover them with a modest swirl of frosting. If the centers are wet, return them to the oven promptly and continue baking until done.
Mistake 3: Lumpy cheesecake filling
Why it happens: Cold cream cheese is difficult to blend smoothly with sugar and other ingredients.
How to prevent it: Let the cream cheese soften at room temperature for a limited period, then beat it before adding the remaining ingredients.
How to correct it: Beat the filling gently until smoother before folding in the whipped cream. If the whipped cream has already been incorporated, avoid aggressive mixing that could deflate the filling.
Mistake 4: Watery cheesecake cups
Why it happens: Wet berries, a loose filling, or insufficient chilling can cause liquid to collect in the cups.
How to prevent it: Dry berries thoroughly, whip the cream to medium peaks, and chill the assembled cups for at least two hours.
How to correct it: If a small amount of liquid appears, carefully remove it with a clean spoon and add fresh, dry berries just before serving. Keep the cups refrigerated.
A final troubleshooting principle applies to all three desserts: do not rush cooling. Warm brownies crumble, warm cupcakes cannot hold frosting properly, and unchilled cheesecake filling may not maintain its shape.
Food Safety, Storage, Meal Prep & Reheating
Food safety matters even when preparing sweets. Dairy-based fillings, eggs, and fresh fruit can become unsafe if mishandled.
Preventing contamination
Wash hands before handling ingredients and after touching raw eggs. Clean mixing bowls, utensils, work surfaces, and cutting boards between tasks.
Use separate clean utensils for ready-to-eat berries and other ingredients that may have contacted raw eggs. Do not place finished desserts on plates that previously held raw ingredients without washing them.
Safe storage guidelines
Brownies: Once fully cooled, store them in an airtight container. They generally keep for around three to four days at room temperature when the recipe and environment permit, or approximately one week refrigerated for best quality.
Cupcakes: Unfrosted cupcakes can generally be kept in an airtight container at room temperature for one to two days. Cupcakes with perishable dairy-based frosting should be refrigerated according to the frosting’s ingredients and food-safety requirements.
Cheesecake cups: Cover and refrigerate promptly at 4°C (40°F) or below. Use within three to four days for best quality and safety, provided they have been handled correctly. Add fresh berries close to serving time.
Freezing: Brownies freeze well for approximately two to three months when wrapped tightly. Unfrosted cupcakes can also be frozen for around two to three months. Cheesecake cups may freeze, but the texture of whipped cream and fresh fruit can change after thawing; test the specific recipe before relying on this option for an event.
Room-temperature limits
Perishable desserts should not remain at room temperature for more than two hours, or one hour when the surrounding temperature is above 32°C (90°F). In hot weather, serve chilled desserts in small batches and return the remainder to the refrigerator promptly.
Make-ahead schedule
- Two days ahead: Bake brownies, cool completely, and store airtight.
- One day ahead: Bake cupcakes and prepare the cheesecake cups. Refrigerate the cheesecake cups promptly.
- Event day: Decorate cupcakes, cut brownies, wash and dry any fresh fruit, and add cheesecake toppings shortly before serving.
Reheating
Brownies can be warmed briefly in a microwave if desired, but avoid overheating because they can become tough. Cupcakes are generally best served at a comfortable room temperature when their frosting and storage requirements permit.
Cheesecake cups should be served chilled rather than reheated.
For egg-containing baked goods, use a reliable recipe and bake until properly set. A temperature of 71°C (160°F) is a recognized safety benchmark for egg dishes, but brownies and cupcakes are not always best judged by a single thermometer reading. Follow the recipe’s doneness cues and avoid serving raw batter.
Nutrition & Dietary Considerations
Desserts can fit into a balanced eating pattern when enjoyed in portions that suit individual preferences and nutritional needs. There is no single nutritional profile for all desserts for dessert table arrangements because ingredients, toppings, and serving sizes vary considerably.
The following estimates are illustrative ranges for small portions, not verified laboratory results.
| Nutrient | Mini brownie | Vanilla cupcake without frosting | Berry cheesecake cup |
| Calories | 100–170 kcal | 100–160 kcal | 150–220 kcal |
| Protein | 1–3 g | 2–4 g | 2–5 g |
| Carbohydrates | 12–22 g | 14–25 g | 12–24 g |
| Fat | 5–10 g | 4–8 g | 9–16 g |
| Fiber | 1–3 g | 0–1 g | 0–2 g |
| Sodium | 30–100 mg | 50–150 mg | 80–200 mg |
Actual values depend on portion weight, ingredient brands, frosting, and toppings. Use a nutrition calculator with the exact recipe if precise figures are required for publication.
Dietary adjustments
Gluten-free: Choose a suitable gluten-free flour blend for the brownies and cupcakes, and use certified gluten-free biscuits for the cheesecake base.
Dairy-free: Use appropriate dairy-free butter, milk, cream, and cream cheese alternatives. Texture and flavor may differ from conventional versions.
Lower-sugar preferences: Consider smaller portions, less frosting, or a berry-forward presentation. Sugar plays a structural role in baking, so large reductions can change the result.
Nut allergies: Avoid nut toppings and check ingredient labels for potential cross-contact.
These desserts are intended as occasional treats rather than medical or weight-loss foods. No single dessert provides a meaningful guarantee of improved health, and individual nutritional needs vary.
Pairings & Serving Suggestions
A thoughtfully arranged dessert table benefits from contrast. Instead of serving several treats with identical flavors, combine chocolate, vanilla, fruit, and lightly tangy components.
Pairing ideas
Chocolate brownies: Serve with fresh strawberries, raspberries, or a small bowl of lightly sweetened whipped cream. The fruit adds acidity, while the cream softens the intensity of the chocolate.
Vanilla cupcakes: Pair with fresh berries, lemon zest, or a light vanilla frosting. A modest garnish gives the cupcakes an elegant appearance without making them excessively sweet.
Berry cheesecake cups: Add a few blueberries or raspberries immediately before serving. A thin strip of lemon zest can add fragrance, while a small biscuit crumb topping creates extra texture.
Beverage pairings
- Coffee: The roasted notes complement chocolate and buttery baked goods.
- Black tea: Its mild bitterness balances rich brownies and creamy cheesecake.
- Green tea: A lighter option for guests who prefer a less intense beverage.
- Lemon water: A refreshing, non-sweet choice that cleanses the palate.
- Milk or dairy-free alternatives: Familiar options for children and guests who prefer simple pairings.
- Sparkling water with berries: Adds a festive appearance without introducing more sugar.
Dessert-table arrangement
Place taller cupcake stands toward the back, brownies on low platters at the front, and cheesecake cups on a stable tray near refrigeration access.
Use small labels identifying each dessert and its major allergens. Provide separate serving utensils to reduce cross-contact.
For a wedding or large celebration, calculate portions according to the number of guests, event duration, and whether a full cake or other desserts will also be served. For a small family gathering, offering two or three different treats per person across the event is often a useful starting point, although appetites vary.
The aim is a display that looks generous without requiring guests to navigate an overcrowded table.
Final Verdict & Reader Invitation
Creating a memorable dessert table does not require complicated pastry techniques or an expensive collection of sweets. With fudgy chocolate brownies, tender vanilla cupcakes, and creamy berry cheesecake cups, you can build a colorful spread that balances rich flavors, refreshing fruit, and appealing textures.
The secret is thoughtful preparation: measure ingredients accurately, respect cooling and chilling times, use consistent portions, and arrange the desserts so guests can serve themselves comfortably.
At DaliyDelish.com, we believe homemade desserts should feel achievable, enjoyable, and worth sharing. Try these ideas at your next celebration, adjust the flavors to suit your guests, and make the presentation your own.
Bring Your Favorite Party Desserts to Life with Easy, Delicious Ideas
If you prepare this collection, leave a comment with your favorite dessert, rate the recipe when the rating feature is available, and share any questions or helpful variations with the DaliyDelish.com community. We would love to hear how your dessert table turns out!
The best choices offer different flavors, textures, and portion sizes. Mini brownies, cupcakes, cheesecake cups, fruit tarts, cookies, and chocolate dipped strawberries are popular options. Combining rich chocolate desserts with lighter fruit-based treats creates variety and makes the table appealing to different preferences.
For a table with several dessert varieties, plan around two to three small portions per guest as an initial estimate, then adjust according to the event length, guest preferences, and whether a separate celebration cake is available. Smaller portions allow guests to sample multiple treats without requiring full-size servings of everything.
Yes. Brownies and unfrosted cupcakes can usually be prepared one or two days ahead, while no-bake cheesecake cups can be assembled the day before and refrigerated. Add fresh fruit toppings and delicate decorations close to serving time. Always follow appropriate storage guidance for dairy-based fillings and frostings.
Choose three to five complementary desserts, use consistent serving sizes, and arrange them at different heights. Simple white plates, reusable cake stands, homemade labels, and seasonal fruit can create an attractive presentation without expensive decorations. Prepare suitable components in advance and keep the arrangement uncluttered so that each dessert remains easy to see and serve.

Tosique Haider -Passionate writer sharing informative, engaging, and easy-to-read articles across different topics. Focused on delivering valuable content that helps readers learn, explore, and stay inspired every day.